From Development to Deployment: Building and Deploying a Blog API with Node.js, Express, MongoDB, and Mongoose
...a REST API with all CRUD functionalities
Introduction
Building a blog API with Node.js, Express, MongoDB, and Mongoose is a great way to put your web development skills into practice and create a solid foundation for a blog project. This article will guide you through the process of creating a scalable, secure, and fully functional blog API.
As a developer, I am always looking for ways to challenge myself and improve my skills. That's why I decided to build a blog API using Node.js, Express, MongoDB, and Mongoose. These technologies are widely used in the industry and provide a great combination of power and flexibility for building web applications. My goal for this project was to create a backend for a blog that could serve as a starting point for frontend developers looking to work on a similar project.
Throughout this article, I'll take you step-by-step through the process of building the API, from setting up the development environment to deploying the final product. Along the way, I'll share the code snippets, explain key concepts, and provide tips and best practices for building a high-performance and secure blog API.
Target
The target is to fulfill all the tasks here as requested in Altschool Examination Project
- Users should have a first_name, last_name, email, password, (you can add other attributes you want to store about the user)
- A user should be able to sign up and sign in into the blog app
Use JWT as authentication strategy and expire the token after 1 hour
- A blog can be in two states; draft and published
- Logged in and not logged in users should be able to get a list of published blogs created
- Logged in and not logged in users should be able to to get a published blog
- Logged in users should be able to create a blog.
- When a blog is created, it is in draft state
- The owner of the blog should be able to update the state of the blog to published
- The owner of a blog should be able to edit the blog in draft or published state
- The owner of the blog should be able to delete the blog in draft or published state
- The owner of the blog should be able to get a list of their blogs.
- The list of articles endpoint should be paginated
- It should be filterable by state
- Blogs created should have title, description, tags, author, timestamp, state, read_count, reading_time and body.
- The list of blogs endpoint that can be accessed by both logged in and not logged in users should be paginated, default it to 20 blogs per page.
- It should also be searchable by author, title and tags.
- It should also be orderable by read_count, reading_time and timestamp
- When a single blog is requested, the api should return the user information(the author) with the blog. The read_count of the blog too should be updated by 1
- Come up with any algorithm for calculating the reading_time of the blog.
Setting Up Development Environment
Create a directory/folder to house all the projects file, if you prefer creating an empty repository first, you can do that and switch to the folder.
Initialize the Project with
npm initand answer the questions that follow, or usenpm init -yto set the answer as default for all the questions. This should be done in the directory/folder above.Installation necessary dependencies, below are how the dependency section looks after installation,
The main dependencies can be installed by running this in the terminal:
npm i bcrypt dotenv express http-status joi jsonwebtoken moment mongoose mongoose-slug-generator morgan passport passport-jwt winstonwhile the devDependencies can be installed withnpm i -D jest nodemon"dependencies": { "bcrypt": "^5.1.0", "dotenv": "^16.0.3", "express": "^4.18.2", "http-status": "^1.5.3", "joi": "^17.7.0", "jsonwebtoken": "^8.5.1", "moment": "^2.29.4", "mongoose": "^6.7.2", "mongoose-slug-generator": "^1.0.4", "morgan": "^1.10.0", "passport": "^0.6.0", "passport-jwt": "^4.0.0", "winston": "^3.8.2" }, "devDependencies": { "nodemon": "^2.0.20" }Here is a summary of what each package is used for in this project:
bycrypt: To improve security by hashing users' passwords before saving them in the database.
dotenv: To process environment variables that are saved in the .env file.
express: A fast, unopinionated, minimalist NodeJS Framework used in building the API
http-status: For managing HTTP status code and messages. Sending the befitting status code and message is one of the core rules of REST API architecture.
joi: For validating user input against the Models Schema before getting to the data layer.
jsonwebtoken: A library for creating and verifying JSON Web Tokens (JWT) which is used in the Authentication of the API.
moment: A library for working with dates and times.
mongoose: A MongoDB object modeling tool designed to work in an asynchronous environment. It helps abstract writing direct SQL in the project.
mongoose-slug-generator: A plugin for mongoose to automatically generate slugs. This is used in creating a slug from the title of each article, an article with the title: Testing API with Postman will have a slug as testing-api-with-postman which makes it beautiful as URL.
morgan: A middleware for logging HTTP requests.
passport: An authentication middleware for Node.js.
passport-jwt: A Passport strategy for authenticating with JSON Web Tokens (JWT).
winston: A multi-transport async logging library for Node.js.
nodemon : An utility that monitors for any changes in the codebase and automatically restarts the server. It is installed as devDependency and only used while developing, it is not installed during deployment.
Here is the script part of the package.json
"scripts": {
    "start": "node server.js",
    "dev": "nodemon server.js"
  },
The start script is used in deployment while the dev is used with nodemon during development.
MongoDB Atlas is used in the development and deployment, you can register on MongoDB to create an account, it is free 😊
The .env file contains:
  MONGO_URL=your-mongo-atlas-url
  JWT_SECRET=your-secret-key-for-signing-jwt-tokents
  JWT_EXPIRES_IN=tokens-expiration-in-hours
  NODE_ENV=one-of-development-or-production-or-test
Project Structure
I specifically followed Goldberg Project Structure in their Node Best Practices guide which also aligns with how NestJS (an opinionated Nodejs Framework) structures its files. I believe this structure is clean, readable, and easy to understand.
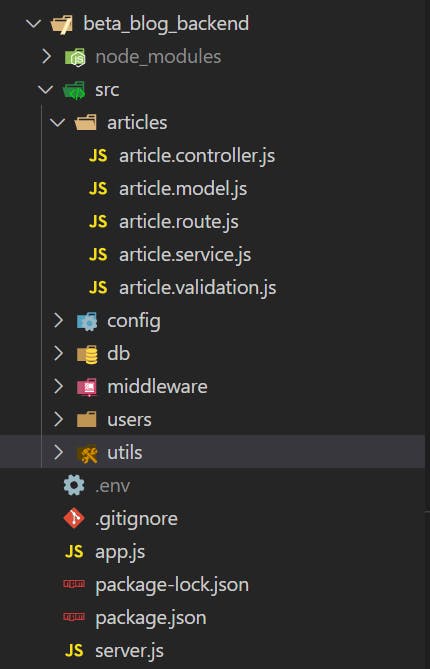
Because Express is an unopinionated framework (it does not dictate how to do things), project structuring varies across individuals, and there is no one way to do it correctly, as far as Express is concerned.
Entities like Articles and Users have their respective folders where all related files to them are contained.
The Route file handles the various endpoint and their methods. Authentication and Data Validation middleware are passed here.
  router
      .route("/")
      .post(
          protect,
          validate(articleValidation.createArticle),
          articleController.createArticle
      )
      .get(articleController.getAllArticles);

  router
      .route("/:slug")
      .get(
          validate(articleValidation.getArticleBySlug),
          articleController.getArticleBySlug
      );
The Controller file handles the request and also sends the response.
  const createArticle = catchAsync(async (req, res) => {
      const article = await articleService.createArticle(req.user, req.body);

      res.status(httpStatus.CREATED).send(article);
  });

  const getArticleBySlug = catchAsync(async (req, res) => {
      const article = await articleService.getArticleBySlug(req.params.slug);

      res.send(article);
  });
The Model file contains the database schema for the entity.
  const articleSchema = new mongoose.Schema(
      {
          title: {
              type: String,
              unique: true,
              required: true,
              trim: true,
          },
          body: {
              type: String,
              required: true,
          },
          slug: {
              type: String,
              slug: "title",
              unique: true,
          },
          author: {
              type: mongoose.Schema.Types.ObjectId,
              ref: "User",
          },
          timestamp: {
              type: Date,
              default: Date.now,
          },
      },
      { timeStamps: true }
  );

  module.exports = mongoose.model("Article", articleSchema);
The Service file is used for handling the business logic relating to the entity.
  const isTitleTaken = async function (title) {
      const article = await Articles.findOne({ title });
      return !!article;
  };

  const getAllArticles = async (filter, options) => {
      const articles = await Articles.paginate(filter, options);

      return articles;
  };
The Validation file contains the defined schema to validate user inputs before being passed to the controller.
  const Joi = require("joi");

  const createArticle = {
      body: Joi.object().keys({
          title: Joi.string().required(),
          body: Joi.string().required(),
          description: Joi.string(),
          tags: Joi.string(),
      }),
  };

  const getArticleBySlug = {
      params: Joi.object().keys({
          slug: Joi.string().required(),
      }),
  };
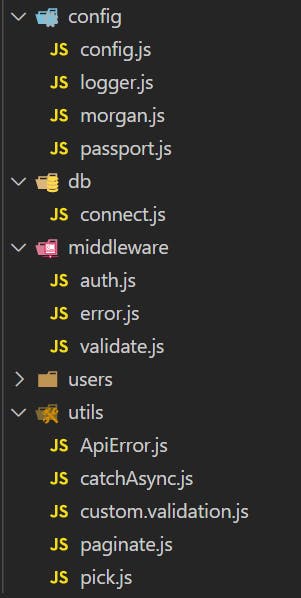
The Config files contain all configurations used in various aspects of the project.
The Db folder contains just a file where connection to the database is implemented
The Middleware folder houses all middleware used in the project.
The Utils (Utilities) contain other reusable modules.
Walking Through The Task
App - Database - Server
Based on Goldberg Project Structure recommendation, there should be app.js and server.js separately. Also, the database connection should exist in a separate file. All middleware and routes are registered in the app.js, while the server.js is where the database and app are coupled.
App.js
  const express = require('express');
  const config = require('./src/config/config');
  const morgan = require('./src/config/morgan');
  const passport = require('passport');
  const { errorConverter, errorHandler } = require('./src/middleware/error');
  const articleRoute = require('./src/articles/article.route');
  const authRoute = require('./src/auth/auth.route');
  const userRoute = require('./src/users/user.route');
  require('./src/config/passport');

  const app = express();

  if (config.env !== 'test') {
      app.use(morgan.successHandler);
      app.use(morgan.errorHandler);
    }
  app.use(express.json());
  app.use(passport.initialize());

  app.use('/articles', articleRoute);
  app.use('/auth', authRoute);
  app.use('/users', userRoute);
  app.get('/', (req, res) => {
      res.send({message: "Welcome to Beta's Blog"})
  })
  app.use('*', (req, res) => {
      res.send({message: "Route Not found"})
  })

  app.use(errorConverter);

  app.use(errorHandler);

  module.exports = app;
Connect.js
  const mongoose = require('mongoose');

  const connectDB = (url) => {
      return mongoose.connect(url);
  };

  module.exports = connectDB;
Server.js
  require('dotenv').config();

  const app = require('./app');
  const config = require('./src/config/config');
  const logger = require('./src/config/logger');
  const connectDB = require('./src/db/connect');

  const startServer = async () => {
      try {
          await connectDB(config.mongoUrl);
          app.listen(config.port);
          logger.info(`Db connected and app listening on port ${config.port}`)
      } catch (error) {
          logger.error(error);
      }
  };

  startServer();
Config
As seen on the app.js and server.js, all required variables are coming from the config file which is in the config folder, other configurations like logger, passport and morgan are also placed in the config folder.
config.js
  const dotenv = require('dotenv');
  const path = require('path');
  const Joi = require('joi');

  dotenv.config({ path: path.join(__dirname, '../../.env') });

  const envVarsSchema = Joi.object()
    .keys({
      NODE_ENV: Joi.string().valid('production', 'development', 'test').required(),
      PORT: Joi.string().default(3000),
      MONGO_URL: Joi.string().required(),
      JWT_SECRET: Joi.string().required(),
      JWT_EXPIRES_IN_MINUTES: Joi.string().required(),
    })
    .unknown();

  const { value: envVars, error } = envVarsSchema.prefs({ errors: { label: 'key' } }).validate(process.env);

  if (error) {
    throw new Error(`Config validation error: ${error.message}`);
  }

  module.exports = {
    env: envVars.NODE_ENV,
    port: envVars.PORT,
    mongoUrl: envVars.MONGO_URL,
    jwt: {
      secret: envVars.JWT_SECRET,
      expireInMinute: envVars.JWT_EXPIRES_IN_MINUTES,
    }
  };
passport.js
This file contains the strategy for authenticating users with JSON Web Token. It is imported and initialized in the app.js file.
  const { Strategy: JwtStrategy, ExtractJwt } = require("passport-jwt");
  const passport = require("passport");
  const User = require("../users/user.model");
  const config = require("./config");

  const jwtOptions = {
      secretOrKey: config.jwt.secret,
      jwtFromRequest: ExtractJwt.fromAuthHeaderAsBearerToken(),
  };

  passport.use(
      new JwtStrategy(jwtOptions, function (jwt_payload, done) {
          User.findOne({ email: jwt_payload.email }, function (err, user) {
              if (err) {
                  return done(err, false);
              }
              if (user) {
                  return done(null, user);
              } else {
                  return done(null, false);
              }
          });
      })
  );
logger.js
This contains the configurations for using Winston to provide logs in meaningful and attractive ways. The Winston level also helps in giving befitting prefixes to each log and helps to know the exact level of each log, unlike the native console that does not give the log levels. The color difference only applies when in development based on the configuration, this can be changed, and you can check the comments in the codes.

  const winston = require('winston');
  const config = require('./config');

  const enumerateErrorFormat = winston.format((info) => {
    if (info instanceof Error) {
      Object.assign(info, { message: info.stack });
    }
    return info;
  });

  const logger = winston.createLogger({
    level: config.env === 'development' ? 'debug' : 'info',
    format: winston.format.combine(
      enumerateErrorFormat(),
      config.env === 'development' ? winston.format.colorize() : winston.format.uncolorize(),
  // If you want the logs to be colorized in both environment (either production or development), you can remove the Ternary operator above and use winston.format.colorize() directly
      winston.format.splat(),
      winston.format.printf(({ level, message }) => `${level}: ${message}`)
    ),
    transports: [
      new winston.transports.Console({
        stderrLevels: ['error'],
      }),
    ],
  });

  module.exports = logger;
morgan.js
This is used with the logger to improve logs communication, by formatting the IP while in production (you can configure it to format IP in development as well). The error and success handler are being used in the app.js as middleware.
  const morgan = require('morgan');
  const config = require('./config');
  const logger = require('./logger');

  morgan.token('message', (req, res) => res.locals.errorMessage || '');

  const getIpFormat = () => (config.env === 'production' ? ':remote-addr - ' : '');
  const successResponseFormat = `${getIpFormat()}:method :url :status - :response-time ms`;
  const errorResponseFormat = `${getIpFormat()}:method :url :status - :response-time ms - message: :message`;

  const successHandler = morgan(successResponseFormat, {
    skip: (req, res) => res.statusCode >= 400,
    stream: { write: (message) => logger.info(message.trim()) },
  });

  const errorHandler = morgan(errorResponseFormat, {
    skip: (req, res) => res.statusCode < 400,
    stream: { write: (message) => logger.error(message.trim()) },
  });

  module.exports = {
    successHandler,
    errorHandler,
  };
Tasks 1 & 2
- Users should have a first_name, last_name, email, password, (you can add other attributes you want to store about the user)
- A user should be able to sign up and sign in into the blog app
Use JWT as authentication strategy and expire the token after 1 hour
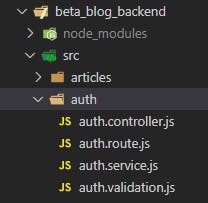
This first task is accomplished by creating a User Schema in the user entity as user.model.js. The route, controller, service, and validation for the task are located in the auth entity.
user.model.js
Apart from the schema defined here, other important aspects of this file are the:
createJWT: This method is used in the auth.service.js to generate and sign a token for the user.
comparePassword: This method is used in comparing the hashed saved password in the database with the plain password the user submitted during login.
Mongoose pre-save hook: This is a mongoose middleware that will be called anytime we want to save a data with the Schema. It is responsible for hashing the user's plain password before being saved in the database.
Article field: This is used to reference the articles' IDs created by the user. It is placed in an array because it is a one-to-many relationship (i.e a user can have multiple articles).
  const mongoose = require("mongoose");
  const bcrypt = require("bcrypt");
  const moment = require("moment");
  const jwt = require("jsonwebtoken");
  const config = require("../config/config");
  require("dotenv").config();

  const userSchema = new mongoose.Schema(
      {
          email: {
              type: String,
              unique: true,
              required: true,
          },
          username: {
              type: String,
              unique: true,
              required: true,
          },
          password: {
              type: String,
              required: true,
          },
          firstname: {
              type: String,
              required: true,
          },
          lastname: {
              type: String,
              required: true,
          },
          role: {
              type: String,
              default: "user",
              enum: ["user", "admin"],
              required: true,
          },
          articles: [
              {
                  type: mongoose.Schema.Types.ObjectId,
                  ref: "Article",
              },
          ],
      },
      { timeStamps: true }
  );

  userSchema.pre("save", async function () {
      const salt = await bcrypt.genSalt(10);
      this.password = await bcrypt.hash(this.password, salt);
  });

  userSchema.methods.createJWT = function () {
      const payload = {
          id: this._id,
          email: this.email,
          iat: moment().unix(),
          exp: moment().add(config.jwt.expireInMinute, "minutes").unix(),
      };

      return jwt.sign(payload, config.jwt.secret);
  };

  userSchema.methods.comparePassword = async function (
      candidatePassword,
      userPassword
  ) {
      return await bcrypt.compare(candidatePassword, userPassword);
  };

  module.exports = mongoose.model("User", userSchema);
auth.route.js
This is where the various auth routes are defined i.e login and register, and the necessary middleware are passed before calling the controller.
The validate middleware ensures that only expected data is received from the client, if the validator passed, the controller is called, otherwise, a Bad Request error will be thrown.
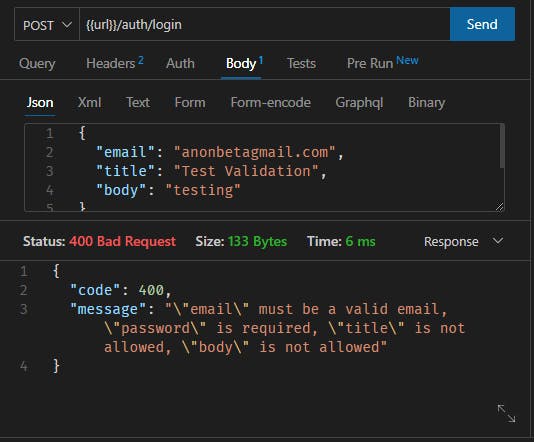
  const express = require('express');
  const validate = require('../middleware/validate');
  const router = express.Router();
  const authController = require('./auth.controller');
  const authValidation = require('./auth.validation')

  router.route('/register').post(validate(authValidation.register), authController.register);

  router.route('/login').post(validate(authValidation.login), authController.login);

  module.exports = router;
auth.controller.js
After the Validations are passed, the controller takes the request and sends it to the service. It is recommended that all business logic should be within the service, this helps in making the controller clean.
The catchAsync is used in handling Promises and calling the next() middleware with the appropriate tag when successful or when there is an error.
  const User = require("../users/user.model");
  const authService = require("./auth.service");
  const httpStatus = require("http-status");
  const catchAsync = require("../utils/catchAsync");

  const register = catchAsync(async (req, res) => {
      const user = await authService.register(req.body);
      res.status(httpStatus.CREATED).send(user);
  });

  const login = catchAsync(async (req, res) => {
      const user = await authService.login(req.body);
      res.status(httpStatus.OK).send(user);
  });

  module.exports = {
      register,
      login,
  };
auth.service.js
This is where all logic is carried out, either successful or failure, it sends the appropriate response back to the controller.
It is a good security measure not to specify which details are not correct when a user is trying to login, which is why the logic of incorrect email or password is combined.
  const httpStatus = require("http-status");
  const ApiError = require("../utils/ApiError");
  const Users = require("../users/user.model");

  const isEmailTaken = async function (email) {
      const user = await Users.findOne({ email });
      return !!user;
  };

  const isUsernameTaken = async function (username) {
      const user = await Users.findOne({ username });
      return !!user;
  };

  const register = async (userBody) => {
      if (await isEmailTaken(userBody.email)) {
          throw new ApiError(httpStatus.BAD_REQUEST, "Email already taken");
      }

      if (await isUsernameTaken(userBody.username)) {
          throw new ApiError(httpStatus.BAD_REQUEST, "Username already taken");
      }

      const user = await Users.create(userBody);
      const token = user.createJWT();
      return { user, token };
  };

  const login = async (userBody) => {
      const user = await Users.findOne({ email: userBody.email });

      if (
          !user ||
          !(await user.comparePassword(userBody.password, user.password))
      ) {
          throw new ApiError(
              httpStatus.UNAUTHORIZED,
              "Incorrect email or password"
          );
      }
      const token = user.createJWT();

      return { user, token };
  };

  module.exports = {
      register,
      login,
  };
auth.validation.js
This handles the validation of data coming from the client. It is also used in validating email and ensuring the password meets certain criteria. The email validator is inbuilt by Joi while the password validator is custom.
  const Joi = require("joi");
  const { password } = require("../utils/custom.validation");

  const register = {
      body: Joi.object().keys({
          email: Joi.string().required().email(),
          username: Joi.string().required(),
          password: Joi.string().required().custom(password),
          firstname: Joi.string().required(),
          lastname: Joi.string().required(),
      }),
  };

  const login = {
      body: Joi.object().keys({
          email: Joi.string().required().email(),
          password: Joi.string().required().custom(password),
      }),
  };

  module.exports = {
      register,
      login,
  };
Deployment
The project is deployed using Cyclic.sh, which seems to be the best, at the time of writing, for hosting such personal and practice projects. They offer a robust and easy deployment process, and keeping the server online without a time limit is a huge factor in selecting them.
Links Related To The Project
Project Repository: It is hosted on GitHub - BetaBlog API Repository
API Documentation: This is done with Postman - BetaBlog API Documentation
Deployed Link: Here is the deployed link from Cyclic - https://dark-gold-sparrow-sari.cyclic.app
To-Do
Versioning the API: Versioning, the act of ensuring an update to a newer version of the API won't stop older versions from working, is another core concept in REST API Architecture. I will be working on this and update the article when done.
Implementing Transaction for multiple requests: The A in ACID (a concept in Database Management for ensuring correctness and consistency of data in the database) which stands for Atomicity, is about ensuring all related process pass or fail. There are instances where I have multiple processes in my business logic, I will be working on ensuring Atomicity by using MongoDB Transaction.
Working with a Frontend Developer to make use of the endpoints, thereby fixing other bugs that might be skipped during the development process.
Conclusion
In this article, we walked through the process of building a simple blog API using Node, Express, MongoDB, and Mongoose. We discussed how to set up the project and configure the necessary dependencies, as well as how to define and implement the various routes, controllers, services, and database models. Through this process, we were able to create a functional API that allows users to create, read, update, and delete blog articles, as well as authenticate the users.
In conclusion, building a blog API is a great way to learn and practice web development skills, and by using a powerful combination of technologies such as Express, Node, MongoDB, and Mongoose, you can create a performant, scalable, and feature-rich application. With some additional work, you'll be able to provide your users with an enjoyable blog experience.
Thanks for reading!

